Saturday, May 29, 2010

Super Simple, Super Delicious! Keilbasa with Apples and Onions

I remember my mom making this when I was a kid and I thought, "how weird! apples and onions together??"

While I didn't appreciate them as a kid, I sure do now.  This is another one of my favorites, and it's so simple to make.

What you'll need:

1 Keilbasa (I use the kind shaped like a U, should serve 4 people)
1 Medium Onion (I think I used Sweet Vidalia)
1 Large Granny Smith Apple (or you can use any tart baking apple, but not the Red or Green Delicious variety, they are a bit too mushy for this task)
1 Large Pan (frying)
1 Cutting board
A knife
Optional (but not really) some Perogies (yeah, you can use the frozen kind, I did)

So, if you're going to have perogies with it (and why wouldn't you??!) go ahead and start the water to boiling with a little salt and a dash of olive oil.


Slice the keilbasa on the diagonal and drop it into a fairly hot pan.  You'll want the heat a bit on the high side so you get some nice browning on the keilbasa, but not so high that it burns.  So keep and eye on it and stir periodically to get both sides done.


While that is getting nice and browned, slice your onion.  I've heard a million tricks to slice an onion without tears, but I prefer to just suck it up, it's part of the fun of cooking!  Now you want your onion slices kind of on the large side.  Even if you think you don't like onions, these are going to be so delicious you're going to change your mind!
Once the onion is sliced, toss it into the browed keilbasa and turn the heat down to a fair medium.


By now your water for the perogies should be boiling, so go ahead and toss them (don't toss, they'll splash, pour them gently) into the water and cook according to instructions on the package.

Now let's pretend that I wasn't in such a hurry and that I actually remembered to take a picture of the chopped Granny Smith Apple before I tossed it in after the onions.  You want to core the apple, then slice into wedges and make sure all the seeds and tough bits are done.  But don't peel the apple, that's where all the vitamins are!  Besides, if you peel the apple, you make baby kittens cry, and we don't want that.  Once the apple is cored, wedged and de-seedified, chop each wedge into 3 or 4 pieces and toss them ito the pan.

Add: a few shakes of tumeric.  Yep, that's all.


Continue to stir, but gently.  You want everything cooked equally, but you don't want to mush up the apples.

Once the perogies are done, drain the water and add the perogies to the pan and allow them to absorbe some of the color and flavor. 


ENJOY!

Sorry the last picture is so fuzzy, but I was hungry and wanted to eat!

Sunday, May 23, 2010

World's Easiest Recipe: Cinnamon-Sugar Tortilla Crispies


So, by now you've probably figured out that none of the recipes I post are very complicated or difficult.  If you want complicated and difficult, you'll need to convince my brother or sister to start a blog.  No, really, my brother is a musician/chef, and my sister is a rocket scientist who makes her own fondant and whipped cream (but not together, that'd be odd...)

I'm the slow one in the family :)

But that's good news for you, because it means none of these recipes should require anything more than the most basic kitchen would normally have.

So, without further ado, the World's Easiest Recipe! No really, it's as easy as making toast!

What you need is....

a tortilla (I used flour)
a smidge of butter or margerine
a sprinkle of cinnamon
a sprinkle of sugar
a cutting board
a cookie sheet (foil is optional)
a spoon
a pizza cutter (or knife, if your pizza cutter is in the dishwasher!)


Preheat your oven to 350(f)


So, place 1 tortilla on the cutting board.
Schmear with a smidgen of butter. (I find this task infinitely easier when I use the back of a spoon instead of a butter knife)
Sprinkle with cinnamon
Sprinkle with sugar (I used raw, cuz I like the taste better)


Cut into 8ths and place on cookie sheet.
Bake for 5 minutes at 350(f), then crank the oven up to BROIL, BABY!  Watch closely and remove when the crispies are bubbly and just starting to brown.

Enjoy!


Saturday, May 1, 2010

Taste Like Home: EggInnaHole for Breakfast

In the chaotic ballet that was my childhood, there were some repeat players in the form of Rick, Clara and Angela. Angela is actually my baby sister's age, and for one reason or another it seems we were constantly at one another's houses. Happy times to see Amy and Angela running around playing while the grown-ups chatted and the older kids (that’d be me and Michael) were torn between kidsplay and grownup discussions. The very first time I remember eating this dish, Rick made it.

For me memories are mostly vignettes: short moments in time caught on the grainy, slightly jumpy super8 of my memory, with the color, focus and cropping all slightly out of whack. In this particular vignette the kitchen is filled with light, people are happy and there is an air of anticipation. Sometimes the best part of a meal is the memories that come with it. Memories can make even the simplest ingredients come together to form your favorite dish, and this is one of mine.
________________________________________

EggInnaHole is a very easy dish, and requires very little in the way of prep or cooking. This is a GREAT dish to cook with kids who are just beginning to show an interest in cooking.  I've also heard it called Egg in a Basket and Toad In a Hole, though I understand that typically refers to a different dish.

Here are your Implements of Construction :  If you’ve got those things (or an adequate substitute for them), then you’re ready to go!


Eggs (2 per person)
A Hearty Bread (2 slices per person)
Butter or Margarine (but not cooking spray or oil)
A few herbs or spices of your choice
A cutting board
A butter knife
A small tea-cup or round cookie-cutter
A frying pan
A stove


Once you’ve gathered your materials, it’s a pretty simple operation.


Butter the bread on both sides (This is why you want a good, solid bread. Floppy white bread just can’t stand up and talk back to being buttered on BOTH sides!)

Turn on the stove to a medium – medium high heat.
Lay the buttered bread on the cutting board, and use either a round cookie-cutter or a teacup with a small rim to cut a hole in the center of the bread. (We save the bread “hole” and fry that up in the pan with everything else.)

Place the Bread With a Hole in the pan, and crack an egg into it.
  • Cooking two at a time is perfectly acceptable, provided your pan is large enough
  • I never actually crack the egg into the pan because I am MORTALLY FEARFUL of eating eggshells. I crack them, one at a time, into a bowl and then into the pan.


Cook for a few moments, as you would an “over easy” egg. Flip and repeat, adding a few spices for some extra flavor if you’d like. (I really love chili powder, cumin and a little Madras curry on eggs!).


These are really great if you serve them while the eggs are still a little runny.


Awesome with other breakfast foods like bacon, sausage, fresh fruit, slice tomatoes, or whatever floats your boat. Best served with fresh ground coffee and good friends!

Sunday, April 11, 2010

Fed Up With Lunch: The School Lunch Project

Fed Up With Lunch: The School Lunch Project


Ms. Q: and undercover teacher/blogger writing on a really important topic. For all of 2010, she is eating school lunch, just like the kids do. Follow her. (note, this is not about weight, it's about health and processed food).

~Kathy


Sunday, March 28, 2010

Resolution Recipe: Split Pea Soup

One of my all-time favorite soups, but oddly enough I have never made it myself!  Since warmer weather is on the way here in New England, this will probably be the last time I make it for awhile.  This recipe was inspired by seeing Paula Deen's husband enjoying her split pea soup so much, and with a nod to Alton Brown's recipe.


2 Cups of Split Peas (I used 1c. each of yellow and green)
4 Cups Chicken Stock
2-3 Cups Water (depending on how soupy you want it)
2 Tablespoons butter
1 Keilbasa sausage or ham (about 1 1/2 cups chopped)
1 medium onion, chopped
3/4 Cup Carrots (grated or chopped small)
2 Tablespoons curry powder
Sage or other savory herbs of your choice
small shake of ground ginger, nutmeg and cinammon

**This recipe doesn't call for salt because you're using chicken broth and cooking with sausage or ham, all of which have plenty of salt. If you're doing a vegetarian version of this dish, you'll need to add salt at the beginning of the cooking process, and then check it again at the end.


Before cooking, shake the split peas onto a cookie sheet (or other clean, flat surface) and sift through them for small rocks. I only found 1, but man you do NOT want to find that the hard way (with your teeth!). Measure out desired amount (for our purposes, 2 cups) then set aside.


For optimal cooking, we (yeah, that's the royal we) recommend a heavy-bottomed pot.


Melt your butter in the pot, then add the chopped onion (you may also add a clove of garlic if you are so inclined, and who isn't??). You really only want to sweat the onion, so cook for 2-3 minutes on medium heat, and watch carefully so the onion doesn't brown. I add the curry powder and other spices and herbs to the onions (mostly because I love the way it smells!)


Once the onion is cooked, add in your split peas, your chicken broth and the water. Increase the heat to bring to a boil.

While it's heating up, grate or shred the carrots and chop up the sausage or ham (or both, heck why not??), then drop them in as well. After it reaches a nice rollicky boil, turn it down to simmer and cover it.


Cooking time should be about an hour and a half, but watch to add more water if needed, and stir occasionally.

I served this with a little cheese sprinkled on top and some French bread on the side. You could also serve it over rice (since peas are a legume, they are really good friends with grains like rice, and your body will get more nutrition out of both of them if you serve them together!).

Sunday, February 21, 2010

Buffalo Soldiers

Page last updated 09/29/2011

This list was compiled with the assistance of the stalwart keyers/arbitrators of Buffalo Soldiers returns on the US Military Records forum  (ancestry.com World Archives Project).  Big shoutouts to mabnightowl, johnnowlin60, kgawne66, scrapma1, rrnatsch, for sharing their resources, and I sincerely hope I didn't forget anyone!

It is important to note that these tools should only be used to deciphering information and handwriting, not for correcting it. As keyers and arbitrators in the WAP project, we're entering data from historical documents.  We're not charged with correcting what was written, we're charged with documenting what was written.  Making assumptions that we know more than the person who was there and actually wrote the document will lead to misinformation.

The purpose of this list of links is to assist folks who are working on the WAP Buffalo Soldiers project as keyers or arbitrators of data records. You can learn more about the project by clicking on the link above. If you'd like to volunteer for this (or any other) keying project, you don't have to have a paid membership at ancestry.com, but you do need to be a registered user. We will not asnwer questions about Buffalo Soldiers WAP Keying project here.  Please use the appropriate forum for any questions.

Mary Ann (mabnightowl) put together a GREAT how-to image for keying Buffalo Soldier returns for WAP. UPDATED to new tool 8/15/2010!!

NEW RESOURCE:  A Facebook Group has been started for WAP keyers (not Buffalo Soldiers-specific, but useful)

Lists- people (enlisted, officers, troops, regiments, etc)
  1. West Point cadets from the 1870 era 
  2. U.S. Army, Register of Enlistments, 1798-1914
  3. Smith's First Directory of Oklahoma Territory - Active Military Personnel (1890 census extracts, etc
  4. Buffalo Soldiers Of New Mexico - 1880 census extraction of Buffalo Soldiers (new link) 
  5. Officers and Enlisted Men of the 9th United States Cavalry Regiment - 1910
  6. ROSTER - 9th UNITED STATES VOLUNTEER INFANTRY 1898 to 1899
  7. 10th Cavalry Roster - Spanish American War 1898 
  8. Fort Davis
  9. Enlisted 9th Cav buried at Ft. Bayard; NM
  10. Buffalo Soldiers Buried at Fort Bayard, MN (slightly longer list)  (NEW)
  11. Buffalo Soldiers from the 9th & 10th buried at Fort Bayard (alphabetized list) (NEW)
  12. Roster of Officers of the 9th and 10th United States Cavalry Regiments - July 28, 1866 (NEW)
LISTS - locations (forts, camps, barracks, ships)
  1. Place Names in the US
  2. Alphabetical list to (some of the) US Forts (clickable links):
  3. "Indian Era" Forts
  4. 9th Cavalry and Fort Naco, Ariz
  5. Kansas Forts: Western US Army Frontier Forts
  6. North American Forts - List of forts with very brief historical notes.
  7. Western N. America (note that there are links to updated info, but it has not all been incorporated into the original site)
  8. Wikipedia - List of United States Army installations
  9. Burial Registers for Military Posts, Camps, and Stations, 1768-1921 (some narrative at the begining)
  10. Frontier and Colonial Forts of the United States
  11. Links to Old West Forts and Towns
  12. ZC (Ship) Files - Navy Department Library - list of ship names, useful particularly for working on documents from Philippines
  13. Towns of the USA 
  14. Ghost Towns  (warning, midi file starts when page loads, just a little annoying)
  15. Colorado Places by County
  16. List of Forts in Philippines (Wiki) (NEW)
  17. US Military Bases in Philippines Over Time (NEW)
  18. Utah Forts of the Old West (NEW)
Useful Books
  1. PDF format downloadable book, "Biographical register of the officers and graduates of the U. S. Military academy, from 1802 to 1867. Rev. ed., with a supplement continuing the register of graduates to January 1, 1879"  - Mary Ann says, "Using the search tool once you download it, you can find even some of the hardest officers to locate (though likely not ALL!)"
  2. THE TENTH REGIMENT OF CAVALRY. By LIEUTENANT JOHN BIGELOW, JR., U. S. A., R. Q. M. TENTH CAVALRY.
  3. Army wives on the American frontier: living by the bugles By Anne Bruner Eales
  4. Biographical register of the officers and ..., Volume 1, Pages 92-5115
  5. Don's Google Book List - A great list of useful books
  6. Internet Text Archive
  7. Domestic United States Military Facilities of the First World War 1917-1919 By Robert Swanson
Narratives
  1. THE NINTH REGIMENT OF CAVALRY
  2. Chronicles of Oklahoma -Volume 2, No. 4 December, 1924 THE NINETEENTH KANSAS CAVALRY IN THE WASHITA CAMPAIGN
  3. The Fort Arbuckle Collection
  4. Kansas Historical Quarterly - The Military Post as a Factor in the Frontier Defense of Kansas, 1865-1869
  5. VisionQuest: Buffalo Soldiers of History  - includes unit histories showing names and places
  6. Buffalo Soldiers Buffalo Soldiers and Indian Wars
  7. Wikipedia on Buffalo Soldiers
  8. Forgotten American History Page - narratives histories of 9th & 10th Cavalry, 25th & 24th Infantry, and much more from 1866 to 1944 (WARNING: includes a VERY ANNOYING pointer animation)
  9. History of 10th Cavalry 1866-1921 - a downloadable, digitized book
  10. 1878 Adobe Barracks, Fort Robinson Nebraska - downloadable, digitized book
  11. Brief History  - 2 page narrative on Buffalo Soldiers
  12. Invisible Men: Buffalo Soldiers of the Sierra Nevada
  13. The 28th Cavalry: The U.S. Army’s Last Horse Cavalry Regiment
  14. Buffalo Soldiers at San Juan Hill - US Army History
  15. THE TENTH REGIMENT OF CAVALRY - US Army History
  16. TWENTY-FIFTH REGIMENT OF INFANTRY - US Army History
  17. Legends of Kansas 
  18. Utah Forts of the Old West (NEW)
Handwriting tools
  1. Deciphering Old Handwriting - From a genealogy course taught by Sabina J. Murray
  2. Commonly Confused Letters in Old Handwriting and Script
  3. Basic Handwriting Tip: The Long S
  4. Reading Old Handwriting
  5. Image Analyzer (free software)
  6. Irfanview Image Analyzer - you can make notes on this one (NEW)
Other  
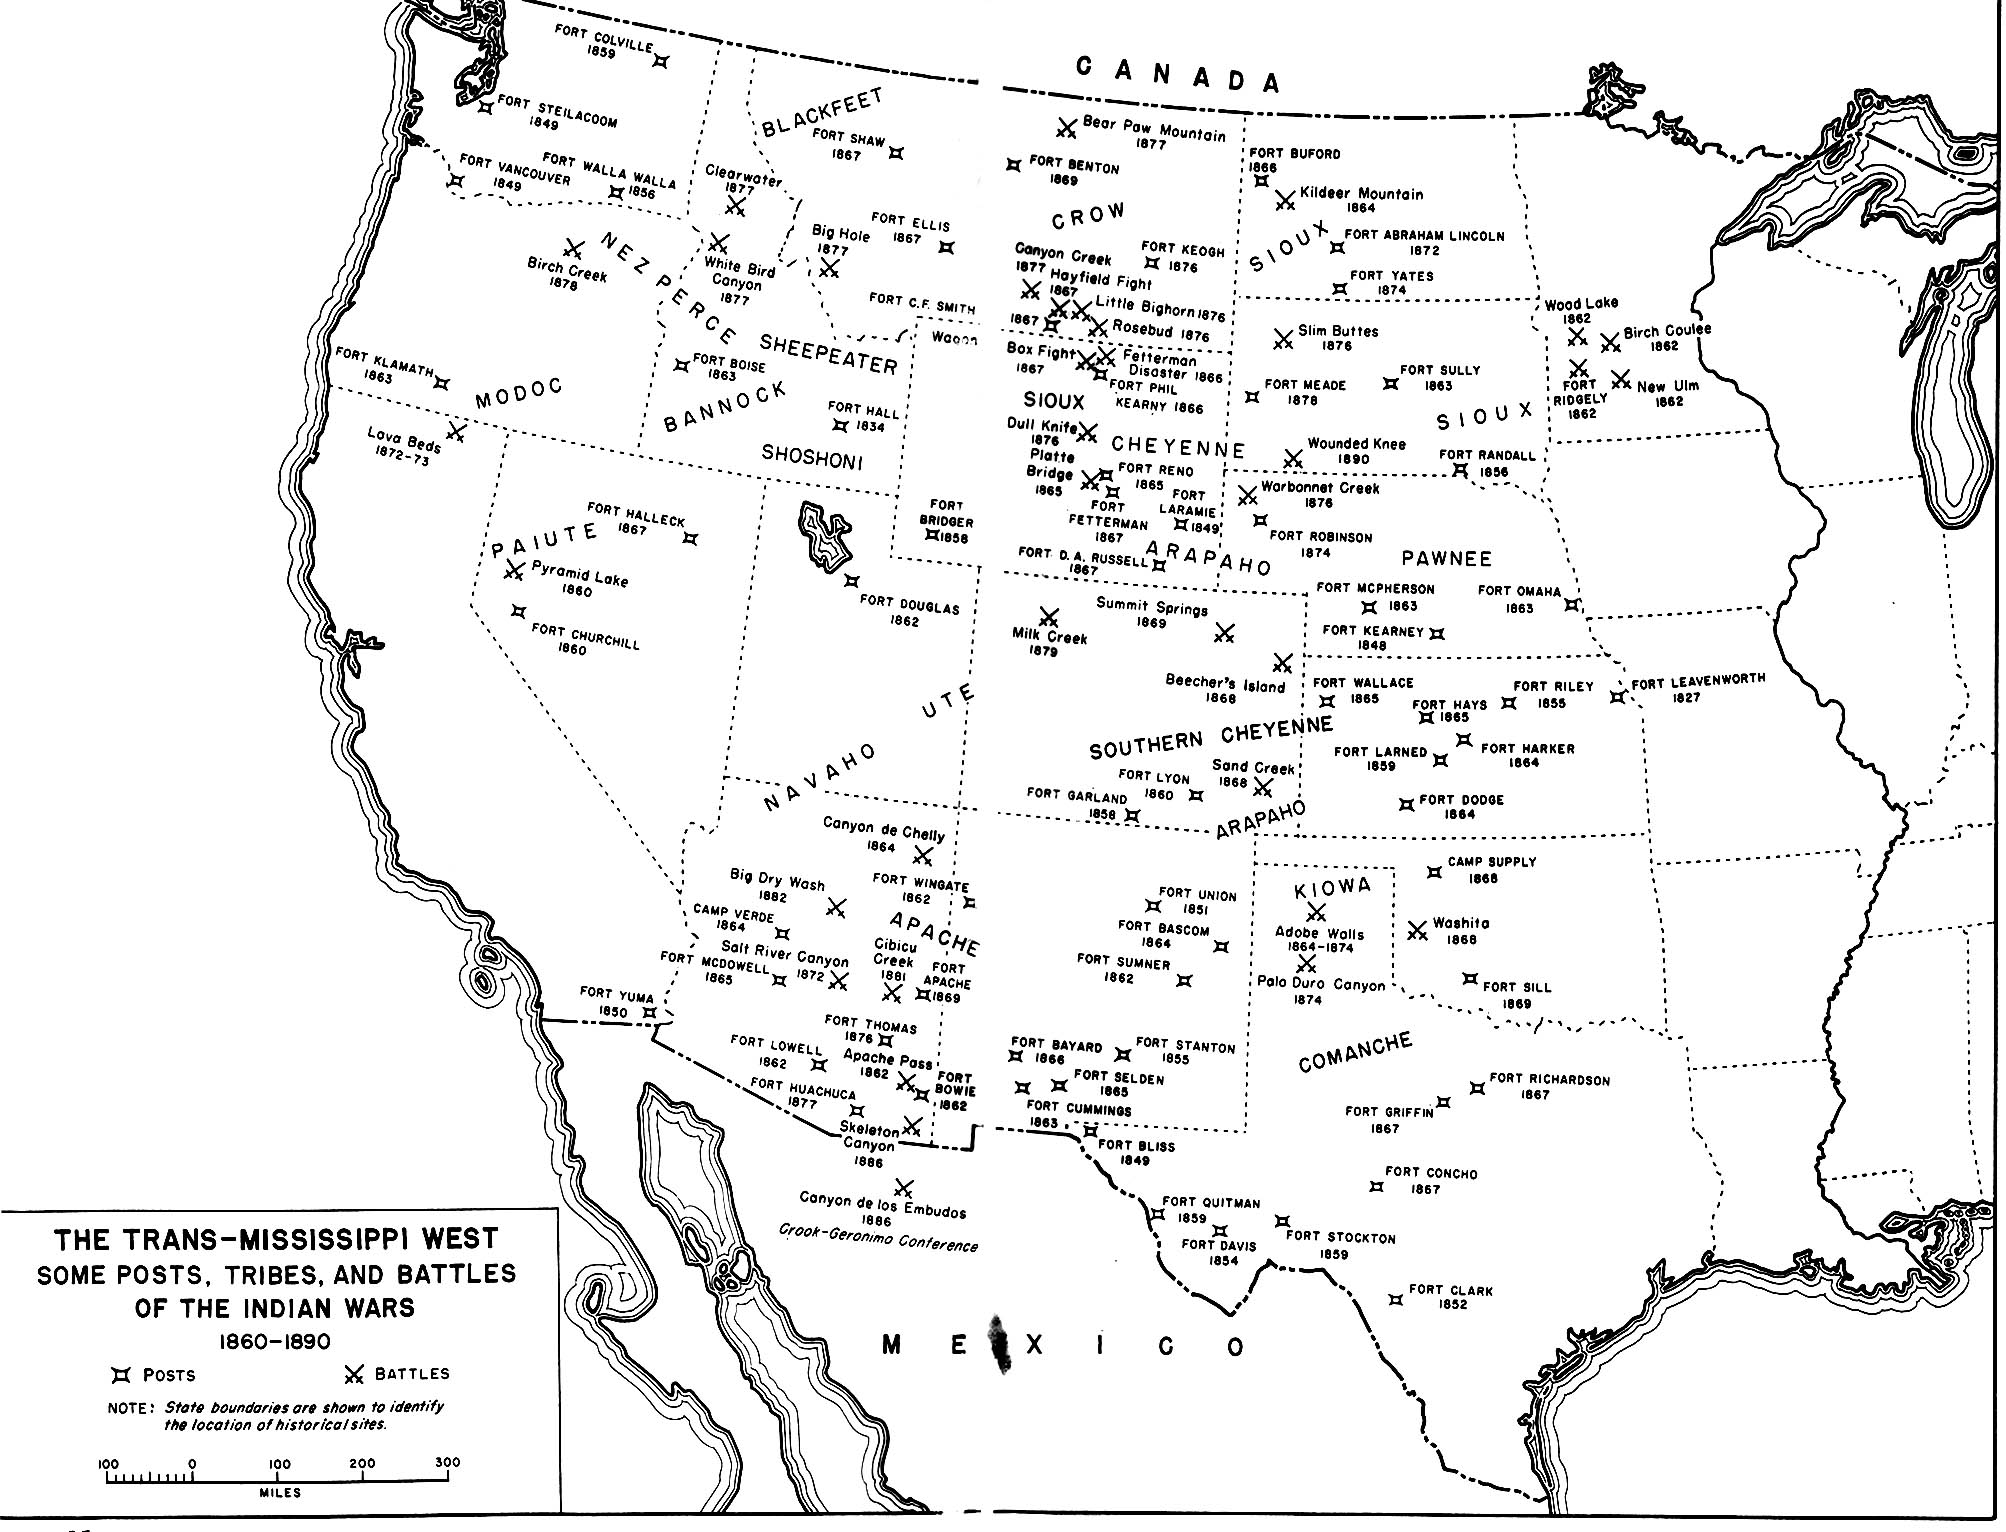
  1. MAP: The Trans-Mississippi West
  2. Historical Maps of the US
  3. Fort Huachuca with photos
  4. Ft Huachuca Timeline (post commanders, etc.)
  5. Nationwide veteran gravesite locator - can be helpful to find someone on your image you can't decipher too well
  6. Mary Ann (mabnightowl) put together a GREAT how-to image for keying Buffalo Soldier returns for WAP (link updated 8/15/2010 to new tool)
  7. Various Buffalo Soldiers links, several actually helpful
  8. Map - Indian Territory
  9. Timeline: US Army - African Americans in the US Army (very minimal info, really basic stuff)
  10. General Order #143 - May 27, 1863 (regarding the organization of African American troops)
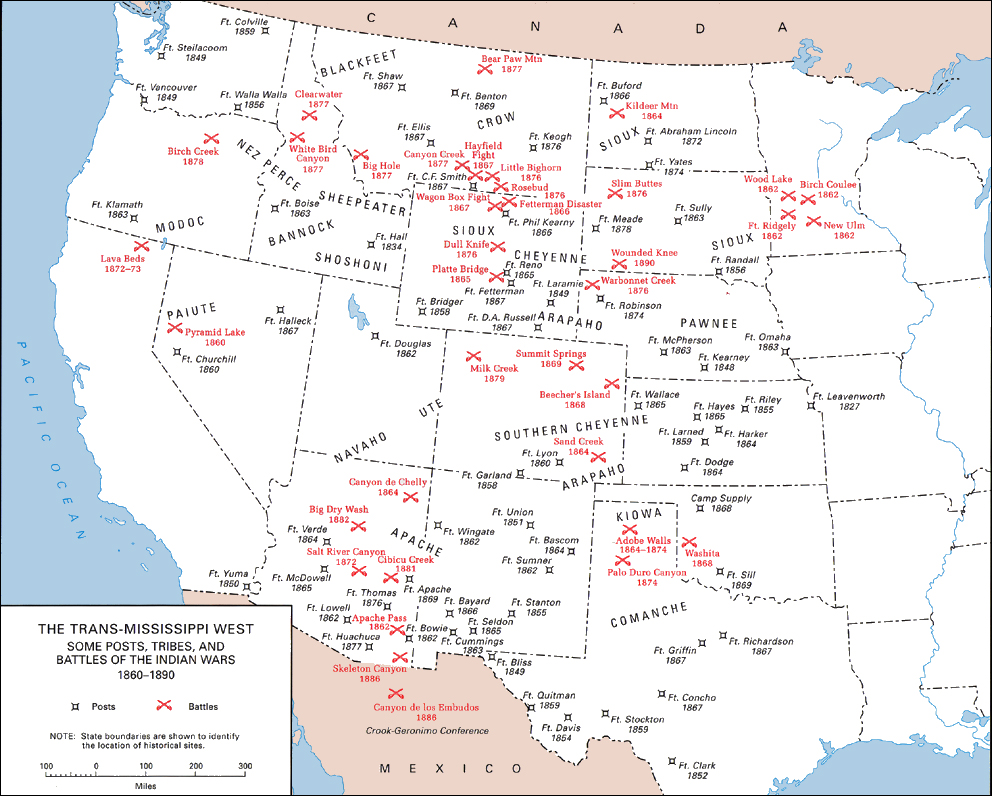
  11. MAP with names "Western Indian Wars 1860-1890, battles, army posts, and the general location of tribes" (NEW)
  12. MAP: New Mexico Map 1895 (NEW)
  13. MAP: Texas Frontier Forts 1849-1852 (new)
  14. MAP: Texas Frontier Forts 1852-1862 (new)
  15. MAP: Texas After the Civil War (new) 

Monday, January 18, 2010

Ring Ring Ring Ring Ring Ring Ring Banana Bread!

Sorry, but the banana phone was out of service!


Everyone knows that the trick to really awesome banana bread is to use those bananas which are all spotty and really just past the point where you want to peel and eat them. It’s hard to time your banana bread craving to the availability of The Perfect Bananas.   Either they’re all yellow and perfect for slicing into your cereal bowl, or they’re perfect for cooking and you have No Time. So…..here’s a little trick.


Toss the bananas into the freezer overnight. (Also great for keeping bananas in that banana-bread-perfect state, once they’re all spotty, toss them in the freezer. They’ll turn black and look unappetizing, but trust me, they’ll work perfectly!)

Sooooooo, that’s your tip, don’t spend it all in one place.


You will need:

¼ pound (yes, pound) of butter (yes, butter) @room temp
½ cup raw sugar (it has more flavor, dagnabbit)
1 ¼ cup self-rising (unbleached) flour
¾ teaspoon baking soda
2 eggs
3 or 4 bananas
¾ cup of sour cream (oh yeah…)
1 teaspoon vanilla
¾ teaspoon cinnamon
3 shakes of ground ginger
1 shake of nutmeg

Start with the butter and sugar. If you’ve got the butter to about room temperature, it will cream with the sugar more easily. If it isn’t quite as soft as you want, DON’T MELT IT!


Just cut it into thin slices, and you’ll be able to blend it with the sugar to a creamy, slightly chunky mixture.


Once you’ve got that all creamed, add allllllll the other ingredients and fold them all together. If you’ve used formerly frozen bananas, you won’t need to mash them first.


If you haven’t (you naughty cook, you), then you probably want to mash them a bit before mixing them in. 


Butter and flour a loaf pan and pour all the gooey, banana-y goodness in.

Now if you’re like me and forgot to preheat the oven, this is a perfect time to turn your oven to 350 degrees(f) and wash out the mixing bowls and implements of cooking. Because hardened banana bread batter is a %#@% to get out!

Bake at 350 for about 45 minutes to an hour- I set the timer for 45 minutes and do the toothpick test. This is a pretty dense bread, so I actually let it cook for about 8 minutes after it passed the toothpick test.


This banana bread is great on its own, or slathered with butter, with a dab of whipped cream, or if you are so inclined, a serving of French vanilla bean icecream.